Box 1 of the minor pentatonic scale
Caution #1
Learning to play the guitar well takes practice. Lots and lots and lots of practice. Everyone tends to underestimate the degree of mastery required by each new exercise.
You simply can’t master the pentatonic (and blues) scales without putting in the hours. The information on this page will take months (at least!) to master.
You shouldn’t rush to get through each exercise introduced below, but neither should you practice things you’ve already mastered. If you can already perform one exercise (say, position one of the minor pentatonic scale) in your sleep, it’s time to move on.
Caution #2
Before starting this lesson, ensure you KNOW your minor triad shapes. In particular, please give RT4b5 • Minor: DGBE another go to brush up. You’ll use those minor triad shapes on the top four strings through the rest of this lesson.Reference document available
I’ve created a pdf of all the penatonic shapes. You may find it useful to keep a printout handy as you practice the exercises introduced below.Introduction
The minor pentatonic scale (and with one more note included, the blues scale) is possibly the most generally applicable scale you’ll ever learn.

Fig 1. Am pentatonic
You’ll find yourself playing minor pentatonic licks over almost any song from any genre. It works (with care) over songs in both minor and major keys.
For simplicity’s sake we’ll continue using Am pentatonic, but you should, of course, practice in multiple keys.
As mentioned previously, figure 1 is too much to absorb in one swell foop.
We started by looking at just a single one-octave shape: the frying pan. The frying pan shape helped us learn about a third of the diagram above. Now it’s time to fill in the remaining gaps.
There are several other ways of breaking figure 1 into more tractable chunks. The most common is to break it into five “boxes” or “positions.” Each “box” contains notes reachable without moving your hand (much).
You’ve probably seen something similar to the following diagram before. It’s commonly referred to as “box 1,” “position 1,” or the “root position” of the Am Pentatonic scale.
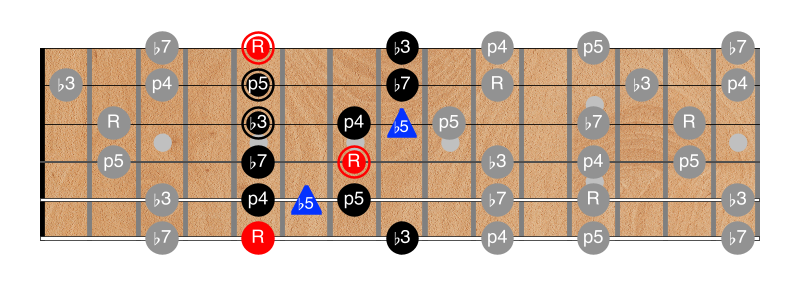
Fig 2. Am pentatonic box 1
Visual complexity
I realize that annotating the diagrams with chord shapes and blue notes makes it more complex visually, but trust me, the additional complexity is worth it.
Chord shapes and the three-note groupings with the blue note provide important aids to recalling the scale from memory, navigating around the fretboard, and knowing which note is which.
We’ll look at the remaining boxes in subsequent chapters of this course.
Chord shape “hooks”
Notice that I’ve highlighted a familiar minor triad shape on the top four strings (the notes outlined with another circle). We’ll use these chord shapes to help us navigate. They give us a “handle” to recall the scale fragment from memory, and they should help us find the root notes.
For example: Let’s say I knew I wanted to solo over Dm. If my hand was already somewhere around the tenth fret, I’d “see” the Dm triad shape at the tenth fret in my mind’s eye (the same shape as in Fig. 2). Then I’d just hang the remaining notes of the scale (that I’ve already memorized) around that shape. The triad shape is the “handle” or “hook” into my memory to recall the full shape.
Of course, for this to work, you must already KNOW your minor triads on the top four strings. That’s why it’s important to practice RT4b5 • Minor: DGBE until you know your minor chord shapes on the top four strings in your sleep.
Above and below
The frying pan isn’t the only one-octave shape. Let’s look at two more.
As should be obvious, figure two is a multi-octave scale fragment. If you were to play it in order from the root on the thickest string to the ♭3 on the thinnest, you would play two complete octaves and a bit of a third.
Start with any root note anywhere on the neck: there’s a ♭3 either three frets higher on the same string, or two frets lower on the next string (remember the fret shift when moving between string 3 and string 2). There are always two options, moving up the neck, or moving down the neck (and over a string).
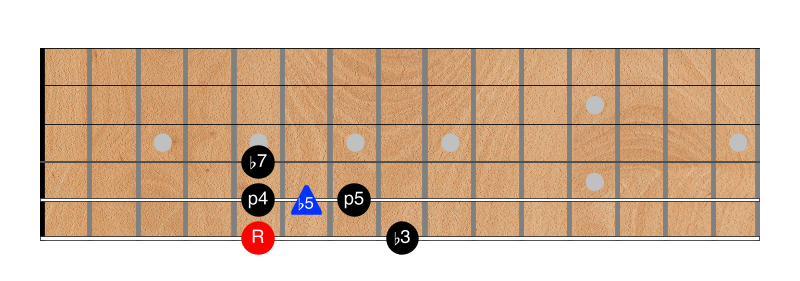
Fig 3. First octave: "above"
The diagram above is a “below” shape.
You’d normally start playing the shape above with your first finger on the root note. The remaining notes are on the same or higher frets. You can reach any of them easily without moving your hand position.
That’s an “above” shape.
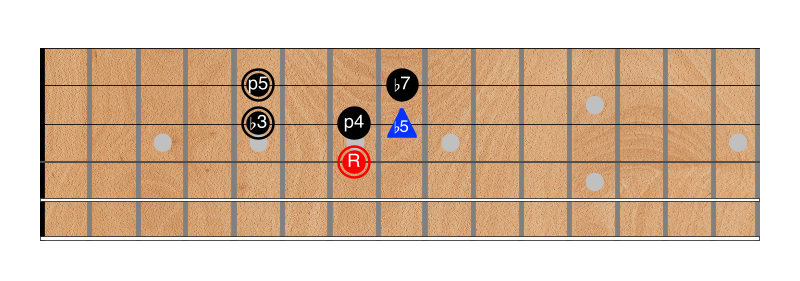
Fig 4. Second octave: "below"
The figure above is a “below” shape.
Familiar?
As an aside, can you see how the shape above is just the familiar frying pan with some of the notes moved an octave?You’d normally start with your third finger on the root. The remaining notes are (mostly) at the same fret or lower on the neck. Again, you can reach the remaining notes without moving your hand.
You can use this “above/below” concept to great advantage: any root note you might want to play around next must be close to either your index finger or your third-finger/pinky. It has to be close to one or the other.
Since your hand already spans four frets, you shouldn’t need to move your left hand very far no matter what the next root note might be.
Watch the pros and notice how efficiently they move their hands. Their hands always seem to be in the right place for the notes they want to play. Their ability to choose shapes that hang higher or lower relative to a nearby target is what allows this efficiency.