Finding Notes
Here is every natural note on the first fifteen frets of the neck:
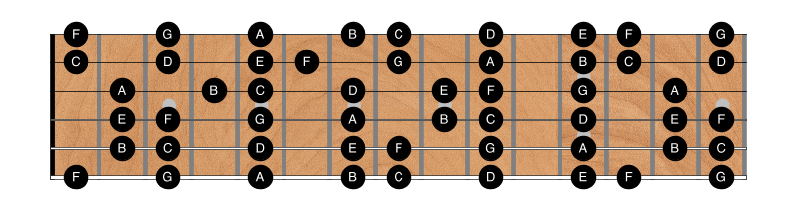
Fig 1. All natural notes
You’ll eventually be able to find and name every single note in this diagram effortlessly. That’s the goal of this page.
I’m not going to kid you, it’s hard to learn all those note locations, especially to the point where you can find notes without thinking.
It will take weeks or months of real practice, but everything gets easier once you’ve learned the note locations.
Warning
This is a very long page. Do not expect to work through all this in one session!
Work through this content in order, from bottom to top. Use the sub-head navigation menu on the right to jump back to where you left off (the menu is under the “hamburger” icon if you’re on a small screen).
Don’t feel like it’s all or nothing, either. Every single note you learn (truly KNOW) pays huge dividends. Even if you only KNOW a few notes (say those at the fifth fret) you’ll find that that little bit of knowledge proves immense help when navigating around the neck. The more notes you know, the easier it becomes to learn more. Eventually, you’ll have the entire fretboard licked. Trust me, you’ll get there sooner than you think.
Remember to always tune up!
Always tune your guitar at the beginning of every practice session. Even if you think you just tuned it and think there is no way it fell out of tune: check the tuning.
You are training your ears as much as your fingers. It’s important to always play the right pitches. Eventually you’ll automagically learn to hear when you are out of tune (and even whether you are sharp or flat) but to get there you need to practice with a guitar that is always in tune.
Why bother?
Why learn the notes on the fretboard? Several reasons, but chief among them:
It makes learning the instrument easier.
It indirectly improves your ear. Knowing which note is which makes it much easier to start hearing relationships between notes.
It makes it much easier to communicate with other musicians.
It makes learning music theory much, much easier. Learning theory in turn makes it easier to understand how songs are constructed, remember them, anticipate chords and melodies, and even to write your own.
Once you know the notes within any given chord, it makes it much easier to “see” chords all over the fretboard. As we saw, a C Major chord isn’t just the one shape you learned in open position. Once you can find the notes C, E, and G everywhere on the fretboard instantly and effortlessly, your rhythm guitar accompaniment will improve dramatically.
The same thing holds true with scales and modes. Learning the notes makes it much easier to solo and improvise. You’ll spend less mental effort as you make music.
It makes learning to read sheet music possible. I’m still ridiculously slow at reading, and learning to read on guitar is harder than many other instruments (because the same note can be played in so many different places) but it’s not impossible. It’s a whole lot easier when you already know where the notes are on the fretboard!
Master proficiency test
The master proficiency test for this lesson is RT1 • Fretboard note mastery. You’ll KNOW all the notes on the fretboard when you can pass that test.
The Process
Like anything with guitar, the way to make this tractable is to break it into small, ridiculously easy chunks. You keep practicing the chunks that give you trouble (and try not to repeat the ones you’ve already mastered!). Again, expect this to take take weeks at best.
First practice with all of the individual TDG subtests linked from this page. When you’re ready, test yourself with the “master” proficiency test RT1 • Fretboard note mastery.
We will follow this sequence to get to the end goal:
- Memorize the cycle of fourths.
- Learn the open strings and notes at the 5th and 12th frets.
- Learn the notes on the lowest (E) string.
- Learn some octave shapes to find notes.
- Practice on one string at a time.
- Practice RT1 • Fretboard note mastery at the beginning of each practice session until you have it nailed. Repeat step 5 for any strings that give you trouble.
Spend as much time as you need on each of these steps. The first few will only take a few minutes to master, but other steps may take days, weeks, or even months. Take your time. Thorough and confident beats quick and sketchy every day.
The cycle of fourths
We’ll frequently want to practice something with all twelve notes of the chromatic scale.
We could just practice each note in alphabetic order, starting at A each time. This is way too easy, though, because you are just making the same motions one fret higher each time. Ascending or descending alphabetically isn’t at all musical, either.
Rather than progressing alphabetically, we’ll usually practice things in fourths (and sometimes in fifths).
As described in the previous post, an interval of a perfect fourth (P4) is five frets, or five half steps. If you start on the note C, going up a perfect fourth arrives at the note F, for example.
Fourths are extremely common in music, especially in chord progressions.
It’s way, way, way too much effort to figure out this every time, though. Instead, it’s far better to simply memorize the sequence by rote.
First, remember the word “bead” and how to spell it.
Now regress to middle school and remember the acronym for “greatest common factor”, GCF.
Put them together and you’ve got most of the sequence: B E A D G C F.
That’s just seven notes, though. The complete cycle of fourths includes flatted versions of the first five notes: B E A D G C F B♭ E♭ A♭ D♭ G♭, in that order. It then continues back around to B again.
I’ll cover this later when we discuss the cycle of fourths in detail, but it’s good to visualize this sequence as the numbers on a clock face. Start with the B at the 7 o'clock position, and the C at the top. Like this:
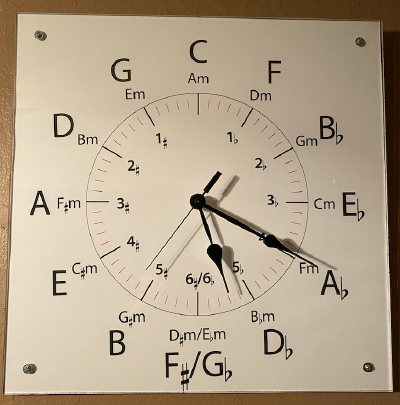
Fig 2. The cycle of fourths
Spend a few moments memorizing which note is at the 12, 3, 6, and 9 o’clock positions on the clock. Burn that into your memory, it will pay off later.
Be sure to practice reciting the cycle of fourths and the cycle of fifths out loud before continuing:
It’s very important that you become equally proficient moving clockwise or counter-clockwise around the cycle (moving in fourths or in fifths).
Open string notes
From lowest (thickest) string to highest (thinnest) the guitar is normally tuned to the notes E, A, D, G, B, and E. From the previous section, you should realize that each string is tuned a fourth higher than the last.
Except something weird happens when going from the third string to the second: C is a fourth higher than G, but the string is tuned to B. G to B is an interval of a Major third, not a perfect fourth. This was done to make it easier to finger most chords, but just memorize these notes: E A D G B e. Note that the highest string is tuned exactly two octaves higher than the lowest.
Practice plucking random open strings and saying the note name out loud for a few minutes. (Believe it or not, saying the names out loud helps your brain remember the names.)
Now fret the strings at the 12th fret and prove to yourself that the notes sound the same, only one octave higher. The thickest string played at the 12th fret is still an E, just one octave higher (the string vibrates at twice the frequency).
Finally, look at figure 1 again, focusing specifically on the fifth fret. Notice that the sixth string at the fifth fret is the note A, the same note as the open fifth string. Same with the D a the 5th fret of the fifth string.
It holds for all the strings except for the third and second string. Again, standard tuning makes everything shift by a fret when moving between the second and third strings.
At the 5th fret the notes are A D G C E a. Practice playing these notes at the 5th fret and saying the names out loud.
I’m not creating any tests for these, since it should only take a few minutes to memorize the notes at the fifth and 12th frets.
Please don’t continue until you are 100% confident you KNOW these notes, however.
Notes on the sixth string
We learned in Just 12 notes that the major scale comprises the intervals whole-step, whole-step, half-step, whole-step, whole-step, whole-step, half-step.
In other words, there is a whole step (two frets) between any two natural notes except E/F and B/C.
Since the open sixth string is the note E, this leads directly to this diagram:
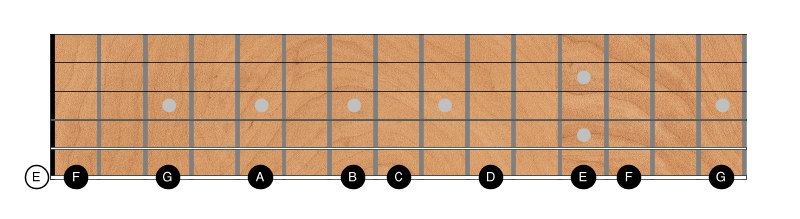
Fig 3. Notes on the sixth string
Spend a few minutes just saying each natural note name out loud as you play each note, ascending up and descending down the frets. Try to do be “mindful” as you do this. The goal is to connect the note names with the fret locations in your brain and muscle memory.
Once you are comfortable just moving up and down the scale linearly, practice RT1c • Along E.
Note that the notes on the low E string are exactly the same (of course) as those on the high E string. Once you can pass RT1c • Along E, you’ve got over half of the fretboard mastered!
Octave shapes
We are now going to learn a trick for finding notes from locations we already know. The shapes used for this trick are extremely useful and you’ll use them forever, but please understand that you don’t really KNOW the fretboard until you no longer need to rely on this trick. It is just a temporary crutch to assist you as you progress.
Let’s channel our inner Marie Kondo and de-clutter figure 1 a bit. The root or tonic of the C Major scale brings me joy, so let’s focus on that note first:
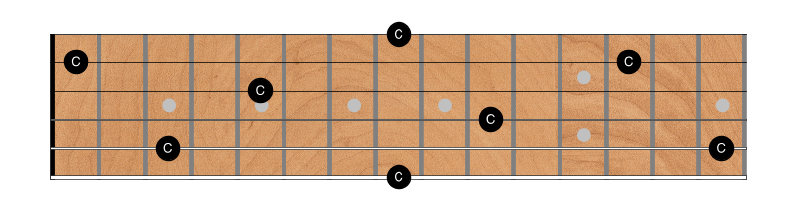
Fig 4. C notes everywhere
It should be obvious if you think about it, but the note C exists in only one location on each string between frets 1 and 12.
We know how to find C’s by counting up or down from notes we already know on the same string, but there’s another way: using shapes/patterns that go across strings.
Octave shape 1
Here’s our first octave shape:
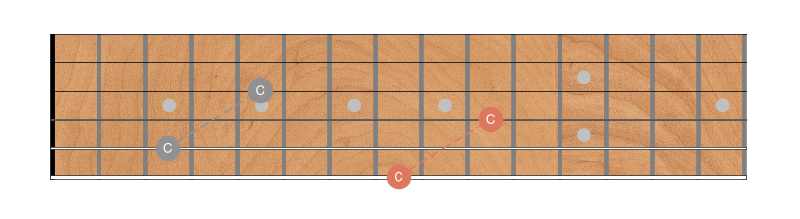
Fig 5. Octave shape 1
If we already KNOW a note on string 6, we can find the same note on string 4 with a little zig-zag: two strings higher and two frets higher. The C at fret 8 on the the E string leads us to the C at the 10th fret of the D string.
The same thing works on the 5th string (the grey notes). The open string is A, two frets higher is B, so C is on the 3rd fret of the A string. If we can find that C, we can also find the C at the 5th fret of the G string. (Of course, you should already KNOW that note since it’s on the fifth fret, but it’s nice to have confirmation.)
What about the higher strings? Let’s look at the octave shapes between the G and high-E strings, and between the D and B strings.
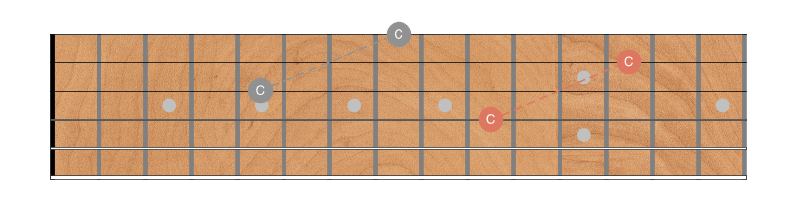
Fig 6. Octave shape 1a
At first glance, this shape may look different than the previous one, but it’s important to realize that they are the same shape, even though there’s an additional fret between the notes.
Because of the tuning anomaly between the G and B strings, we have to move up an extra fret whenever a shape spans the gap between those strings. When navigating from the C at the 5th fret of the G string, we find the C on the 1st string up three frets, not two, on the 8th fret.
Same thing with the C at the 10th fret of the D string. The C on the B string is two strings, and three frets higher at fret 13 on the B string.
Two very important points about this first octave shape:
It works, of course, for any note, not just C. Look again at figure 1: any given note exists two strings higher, and two or three frets higher depending on whether it crosses the G-B string boundary.
It works in both directions, of course. If you KNOW a note on a higher string, you can find the same note two strings and two or three frets lower.
This first octave shape is particularly advantageous if you follow the recommended “one finger per fret” technique. If you put your pinky finger on any note on the high E string, you can find the same note on the G string under your first finger (or vice versa).
If you place your first finger on any note on the fifth or sixth strings, the same note can be found under your third finger two frets higher (or vice versa). Same thing in reverse for notes on the 1st string, only now with your pinky on the first string the same note is under your index finger two strings lower.
So we can use octave 1a to find notes on the 3rd and 4th strings. Just two more strings to go!
Octave shape 2
The next octave shape skips two strings, not just one:
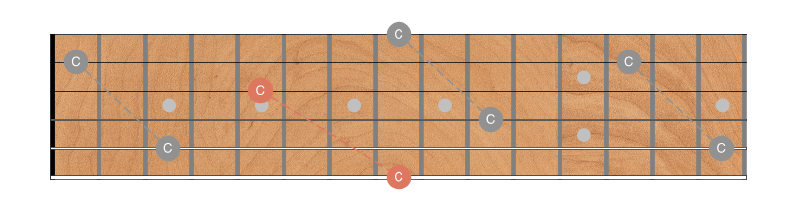
Fig 7. Octave shape 2
Starting from the C at fret 8 on the low E string, we can find another C going over three strings higher and then down three frets. Again, this works in both directions. If, for example, you KNOW a note on the G string, you can find the same note on the low E string by moving up three frets higher.
The “2a” shapes are shown in grey this time. Because we are skipping two strings in this shape, there are two “2a” shapes and only one “2” shape.
Again, whenever you cross the boundary between the 2nd and 3rd strings, you need to adjust by one fret. If you’re going up the strings (toward the thinner strings) you raise the higher note. So moving from the C at the 3rd fret of the A string, you only go down two frets and find the C on the 1st fret of the B string.
Going the other way from the C on the 8th fret of the high E, you find C on the D string at the 10th fret (going up two frets).
Most of the time when playing live, your natural inclination is to move your hand up the neck to play higher and down the neck to play lower. It’s thus more common to use octave shapes 1 most of the time. When you “run out of neck,” though, it can be useful to continue ascending or descending by skipping another string.
Practice finding notes on different strings using RT1d • Octave shapes. Be sure to use the shapes in both directions (moving from a lower note to a higher, and vice versa).
One string at a time
Now that you know the octave shapes you can use them as a temporary crutch for learning the notes on other strings.
Let’s tackle the D string next. Refer back to figure 1 if necessary. You already KNOW that the open string is D, the 5th fret is G, and the 12th fret is another D.
If the open string is D, then E must be at the second fret, and F at the third fret. If G is at the fifth fret, then A is at the seventh, B at the ninth, and C at the tenth.
Practice playing the natural notes just going up and down from the lower D on the open string to the higher D at the 12th fret. As always, say the note names out loud.
Once you can easily ascend and descend alphabetically through the natural notes, try RT1e • Along D.
You’ll probably find that you need to use octave shape 1 as a reminder occasionally. Remember that this is just a crutch, though. Eventually you want to associate each note name with a string/fret location directly. Even one or two KNOWN “landmarks” can help tremendously when navigating.
Once you think you’ve got it down, test yourself with a metronome (half notes at 60 BPM). You don’t know ‘em as well as you thought you did, do you? (laugh)
Once you’ve got the D string licked, move on to other strings the same way.
You’ll need to learn the low E and low A strings by rote, but you can use the octave shapes to help you on the other strings.
Practice the proficiency tests on the remaining strings:
Putting it all together
Once you can play the cycle of fourths on each string individually, it’s time to start practicing RT1 • Fretboard note mastery in it’s entirety.
You’ll be finding each note on all of the strings at once. You may find this quite challenging at first.
I strongly recommend you practice this without a metronome for the first several days. Build up good landmarks in your brain before trying to play in time: the metronome is a harsh taskmaster!
When you’re ready though, set the metronome to a nice s-l-o-w tempo and try playing whole notes at first. Then half notes. For a real challenge, try playing quarter notes at a quick tempo (say 100 BPM).
This is one of those drills that may take years to master. The goal is to know the notes like the back of your hand, but if you can perform RT1 • Fretboard note mastery with half notes at 60 BPM, you’ll know the fretboard well enough to tackle almost any challenge (and better than many guitarists who have been playing for years).
RT1 • Fretboard note mastery is an excellent warm up exercise, and I still perform it at the beginning of almost every practice session. It only takes a minute or two.
Figure 1 doesn’t look so daunting any more, does it?